
Electrics:
'Harlyn Pier' is wired for conventional analogue 12volt dc operation on cab control principles. For me this was the obvious choice as I was already committed and experienced in this from my 'Harlyn Road' days. Also, the majority of my operating team and their guest locos were committed to 12vdc. Whilst DCC has some advantages it is not something I am familiar with, would have been an expensive change and a steep learning curve. Also, as I understand analogue control, I can quickly identify and fix any problems should they occur. Important for an exhibition layout!
The Power Supply: This takes the form of a separate plastic box that stays on the floor, thus keeping the mains power well away from the layout itself. It contains four transformers, three of which provide 16volt ac for the controllers and the fourth 20volt ac which is then rectified and smoothed (thanks Rob) to provide +10vdc / 0vdc / -10vdc supplies for the point motors, lights, LEDs, etc. A custom built cable connects the power box to the control panel using 15-way D-sub connectors.

|

|

|
The Control Panel: This is a timber box that hangs on either the viewing side of the layout (for home use) or the rear of the layout at exhibitions. It has a track plan on the top which is a computer generated A4 plan printed on paper (many thanks again Rob) which is sandwiched between plasticard and perspex. Holes were then drilled through this to accommodate the section, point and signal switches and the LEDs which indicate the route and controller selected.
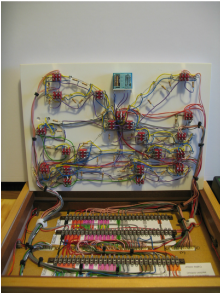
The supplies from the power box are distributed via tag strips within the panel and 25way D-sub sockets on the underside distribute the power to baseboards 1, 2 and 3. Similar sockets are fitted to each baseboard and all are clearly labelled and the wires colour coded as to their function. Hopefully the pictures below will make all this clearer!
The supplies from the power box are distributed via tag strips within the panel and 25way D-sub sockets on the underside distribute the power to baseboards 1, 2 and 3. Similar sockets are fitted to each baseboard and all are clearly labelled and the wires colour coded as to their function. Hopefully the pictures below will make all this clearer!

|
|

|

|
As the orientation of the panel changes when it is moved from the front to the rear of the layout, there are two small DPDT switches on the underside which reverse the track supplies from the controllers, thus ensuring that the direction switches on the controllers always operate logically. Either of the two controllers connected to the panel can be switched to any part of the layout via DPDT centre off switches on the panel, the red/green LEDs indicating the route and controller selected. A third controller in the fiddle yard can be switched to replace either of the other controllers. This enables trains entering or leaving the scenic area to always be driven by the receiving operator.
The controllers used are two H&M Walkabouts and one KPC handheld controller. None of these are available anymore which is a great shame as we have yet to find anything better.
The controllers used are two H&M Walkabouts and one KPC handheld controller. None of these are available anymore which is a great shame as we have yet to find anything better.
Point & Signal Control: Hereby hangs a tail! I was originally attracted to the (then) newly available DCC Concepts "Cobalt" point motors because of their neat size, simple connections and ease of installation. I was planning to use them for both point and signal control and purchased a total of 15! Well, after very little use I reached the point (no pun intended) where 7 of them had failed and others were showing all the signs. (They start clicking instead of stalling after they are thrown as the internal gear train teeth jump.) This level of unreliability is certainly not acceptable for an exhibition layout and I have now dumped the lot!
Control is now in the proven but somewhat larger hands of Circuitron "Tortoise" motors for the points (which luckily I had room for) and either GF Controls or Heathcote Electronics modules controlling servos for the signals. I also made use of a further GF Controls module for the level crossing gates.
The point motors are switched from DPDT switches on the panel which feed either +10vdc or -10vdc to the motor, the common return being the 0vdc supply from each motor. The other pole of the switch looks after the LED route indication on the panel. I did it this way to save on the number of wires between the panel and each baseboard.
